
PAVILION DEVELOPMENT
Parametric Modelling - Zebra and Ladybug
The Grasshopper plugin Zebra has been used to create the wave like form of the pavilion. As an agent based design tool, this allowed me to map a number of pipes to a chosen curve, while each having their own individual character in the way it interacts with others. Ladybug has also been used to find the best direction for the placement of the pavilion that will allow enough shade due to the transparent nature of the material.
What is it?
The behaviour of the path will inform the type of flock to be achieved. In my case,I have chosen the Follow Curve Behaviour, which the agents will all follow the curve. The strength that they will follow it is determined by the multiplier, if it is low, they will have greater variation and a looser path. I have also used 2 curves running the script individually for each curv.
The agents of the flock are controlled by the Flocking Properties. This will adjust the separation between each of the agents paths, the width of each path and also where to make the path smooth or wavy.
After the creation of each path, the type of profile can then be changed, which I experimented with standard pipes, squares and rectangles.


Curve behaviour
Flocking Properties
Section Profile
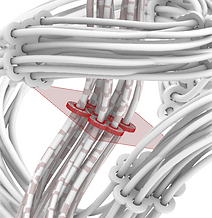
The ring connectors were created by first creating a plane that would be used to mark the location of each connector. Brep Brep was used to get the intersection. Using this intersection, 2 Offsets were used to create the main outer frame and a smaller inner offset which would give the connectors some expansion room. These were extruded by getting the Vector Normal and finally used Solid Difference to get a frame with the cut out holes for the pipe locations.
Structural Component Modelling

